Get The Look: Transform Your Kitchen Cabinets
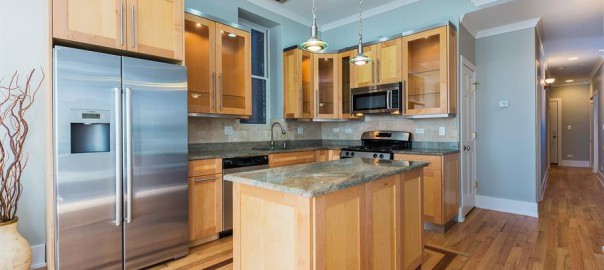
 We finished a charming Lincoln Park condo just a few weeks ago and want to show you how you can make one of its beautiful kitchen features work for your own kitchen (and your budget).
For this project you’ll need a handyman- unless you’re a pro at using a drill, router and utility knife. This is a pretty quick and easy project for a pro so the cost will be reasonable.
Most cabinets are made with the frame of the cabinet doors secured onto the panel like a poster frame that are secured with wood glue from each side. So, with a few cuts to the lips on the backside of the door the panel can be lifted away and what’s left behind is a frame that the glass of your choice can fit securely into.
Glass costs about $3 per square foot at your local hardware store. To ensure that the glass does not slip, jiggle or fit poorly you will need to accurately measure the space inside the door’s frame in which the glass will be placed. You can also take a door with you into the hardware store to make sure nothing is left to chance. Most hardware stores will be able to cut glass for you right then and there. They will also either do this for free or a small fee.
In the picture above you may have also noticed that we opted for glass shelves as well. This keeps the cabinets bright, letting the light shine throughout. You can also take an original shelf into the hardware store for a measurement sample.
Once the glass is cut it should be secured into the lip of the cabinet door with glass clips. These clips are also available at most hardware stores.
We added recessed lighting to pull the entire look together- illuminating the cabinets to highlight the dishes and glassware that will fill them. Recessed lighting costs about $20 per lighting unit and is an upscale yet inexpensive addition.
This kitchen transformation can be done for under $200 if you’re using uncolored glass and doing some of the handy work yourself. If you are in fact going the conquer the power tools yourself you’ll need clamps, a drill or driver, a router with a 1/2 inch bit and a utility knife.
Here are your in-depth instructions guiding you step-by-step. To view more pictures of our finished Lincoln Park project click here.